3. Using Sensors
Up to 8 analog sensors can be connected to the GoGo Board. The sensor ports are located at the lower part of the GoGo Board and are labeled 1-8. The GoGo Board also has two digital sensor ports located at the upper right corner and labeled I2C-1, I2C-2.
Analog sensors are simple to use. The GoGo kit comes with a rich set of sensors out of the box. Since the GoGo Board is compatible with the “Grove” system, a much bigger selection of sensors can be obtained from SEEED studio. Note that not all sensors on the SEEED store are compatible with the GoGo Board. Please refer to the compatibility chart (link required) before making a purchase.
To use a sensor, simply use the supplied sensor cable to connect any sensor to a sensor port. The GoGo Widget displays sensor values as bar graphs with numbers below them. As an example, try connecting a light sensor to port number 1. Exposing this sensor to different levels of brightness will cause the sensor value to change. Try to cover the light sensor using your hand and then release it. You should see sensor 1’s value change accordingly as illustrated in the images below.
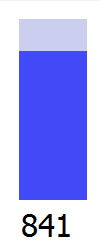

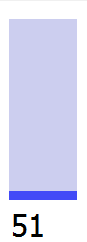

The value of a light sensor will be higher in the top figure because it receives more light than the one below it.